
Headbands are a wonderful accessory to wear. They keep you snug without the bulk and hair flattening factor of a hat.
As a knitting project, headbands are simply really great fun.
They are quick to knit, and perfect for using up small balls of yarn. Headbands even make ideal stash buster knitting projects.
You can knit them in any thickness of yarn, and there are endless patterns and designs available. It is simply not possible to get bored with knitting headbands!
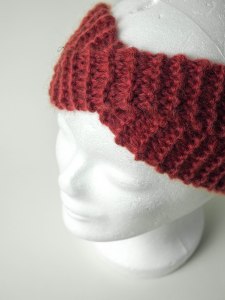
This article is going to explain how to knit a front crossover headband. These headbands are also known as twisted front, or turban style.
They are made by splitting the knitting into two halves about a third of the way down the project. You then knit two strips and join them back together again, making sure that you cross them over first.
Crossing the middle of the knitting in this way gives the headband a really stylish crossover front detailing that makes it a breeze to wear. You won’t need to add appliqués or any other decorations to your knitted headband – the crossed over twist takes care, very simply, that the headband looks fancy enough with no further details required.

How to make a front crossover (twisted front) detail headband
As briefly explained above, the twisted, crossed front is made by literally crossing over two strips of knitting in the middle of the headband.
Your two strips need to be of equal size, so you need to cast on an even number of stitches. An odd number simply won’t work.
If your headband has a pattern made from decorative knitting stitches, the pattern needs to be divisible by two.
Always remember that you are going to split your work in half so that you can cross over the front. You will knit two strips and join them back together, so the the two strips need to be identical.
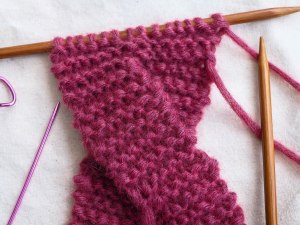
When you reach around 17cm of the piece, half of the stitches will stay on the knitting needle, and you will work the other half of the stitches for a few centimetres. You will then need to place the stitches that you have worked onto a stitch holder, cut the yarn and rejoin it to the stitches that you did not work.
You then knit another strip until it matches the first one. The strips are then simply crossed over and rejoined. The headband is then knit until desired length, cast off and then the seams are joined together.
To demonstrate the above, here is a free (and very easy) knitting pattern which will demonstrate exactly how you can make a crossover, twisted front knitted headband.
Twisted front crossover headband knitting pattern
Ok, to make a headband like the one in the photo, you will need some chunky yarn that works with 6.5mm needles, and a pair of 6.5mm knitting needles. You will also need a stitch holder.
The yarn used in the photo is called Lovely Cashmere by LaLa Berlin. It is a very loft, cashmere rich yarn. You can use any sort of chunky yarn to make your own headband.
Start your headband by casting on 14 stitches.
Then simply knit – garter stitch – until your piece measures 16cm from the cast on edge.
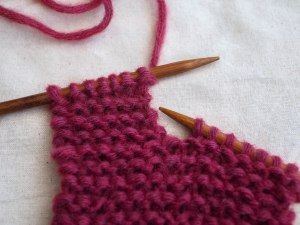
Now knit 7 stitches. You will now work these stitches only, leaving the other 7 stitches on the knitting needle. Knit this piece until it measures 10cm, ending on a right side row. Cut yarn and place these stitches on a stitch holder.
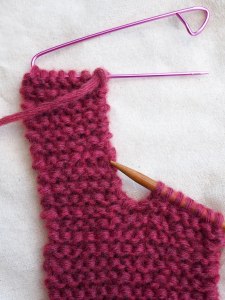
Now attach to yarn to the other 7 stitches and work a matching strip. End on a wrong side row.
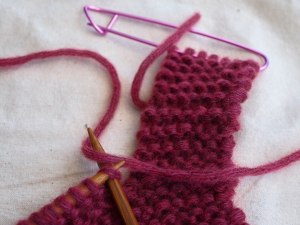
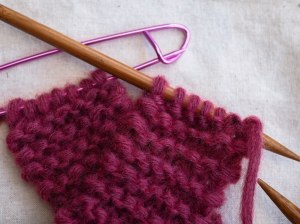
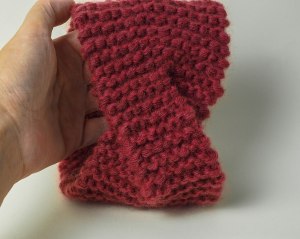
Cross the two strips and knit across, thus making one piece again. You can knit the stitches from the first strip straight from the stitch holder. If the stitch holder is facing the wrong way, simply turn it around.
Now knit until headband is the correct length. For an adult sized headband, 40cm will be about right. Mine is less as it was made for my daughter.
Cast off and sew up the two edges.
Weave in all the yarn ends, paying attention to where the yarn was cut and reattached.
And that’s it! A lovely crossover front headband to keep you snug and cosy.
Thanks so much for visiting today, I hope you enjoyed this article about how to knit a crossover twisted front headband.
You can find some great instant download headband knitting patterns here on Etsy.

